8.2.2 Installation and Configuration of Mautic on the Server

Mautic is a popular open-source marketing automation platform that helps companies manage email campaigns, track contacts, and automate customer interactions. This article details the process of installing Mautic version 6 on an Ubuntu 24.04 server using MySQL.
Main Features of Mautic
Before proceeding with installation, let’s examine the key features of Mautic that make it one of the best solutions for marketing automation:
-
Contact Management and Segmentation
- Unified contact database — centralized storage of information about all customers with interaction history
- Anonymous visitor tracking — monitoring visitor actions before they become identified contacts
- Audience segmentation — creating dynamic segments based on behavior, sources, demographic data, and other criteria
- Custom fields — customizing contact fields to meet specific business requirements
-
Email Marketing
- Email message builder — creating emails using a visual editor without HTML knowledge
- A/B testing — optimizing email campaign effectiveness through testing different variants
- Personalization — dynamic content based on recipient data
- Automatic triggers — sending emails based on user actions
- Delivery analytics — monitoring opens, clicks, and bounces
-
Marketing Automation
- Visual campaign builder — creating complex marketing scenarios through an intuitive interface
- Multichannel marketing — coordinating interactions via email, SMS, web notifications, and social networks
- Automatic actions — setting up automatic reactions to user actions
- Timers and delays — planning sequences of actions with specific intervals
-
Lead Generation
- Form builder — creating responsive forms for data collection
- Landing pages — creating and testing landing pages without involving developers
- Progressive profiling — gradually collecting contact information
- CRM integration — two-way synchronization with popular CRM systems
-
Analytics and Reporting
- Behavior tracking — analyzing contact actions on the site
- Ready-made reports — access to pre-configured reports on campaigns and activity
- Customizable dashboards — creating monitoring panels for specific marketing goals
- Attribution — tracking the contribution of various channels to conversion
-
Integrations
- API and webhooks — integration with external services and applications
- Ready-made connectors — built-in support for popular services and platforms
- Plugin ecosystem — extending functionality through the community repository
Tip: Mautic is especially valuable for companies that prioritize data privacy and complete control over their marketing automation infrastructure, since the solution can be deployed on their own servers.
Server Preparation
Before installing Mautic, you need to consider the following requirements:
- A Virtual or Dedicated server
- Sudo or root access
- Ubuntu Server (22.04 LTS or 24.04 LTS recommended)
- PHP 8.1 or higher with necessary extensions:
- cURL
- mbstring
- JSON
- GD
- XML
- ZIP
- intl
- MySQL/PDO
- MySQL 5.7.14 or higher (MySQL 8.0 recommended)
- Web server (Apache or Nginx)
- Minimum 2 GB RAM
- Minimum 10 GB free disk space
System Update
- Update the package list and install updates:
sudo apt update && sudo apt upgrade -y
- Install necessary repositories:
sudo apt install software-properties-common
sudo LC_ALL=C.UTF-8 add-apt-repository ppa:ondrej/php
sudo apt update
Installing the LAMP Stack
Mautic runs on the LAMP stack (Linux, Apache, MySQL, PHP), so let’s first install these components:
sudo apt install -y apache2 mysql-server php8.2 libapache2-mod-php8.2 php8.2-cli php8.2-common php8.2-zip php8.2-xml php8.2-mysql php8.2-imap php8.2-intl php8.2-curl php8.2-gd php8.2-mbstring php8.2-bcmath unzip

Database Configuration
- Configure auto-start and start MySQL:
sudo systemctl enable mysql
sudo systemctl start mysql
- Configure MySQL security:
sudo mysql_secure_installation
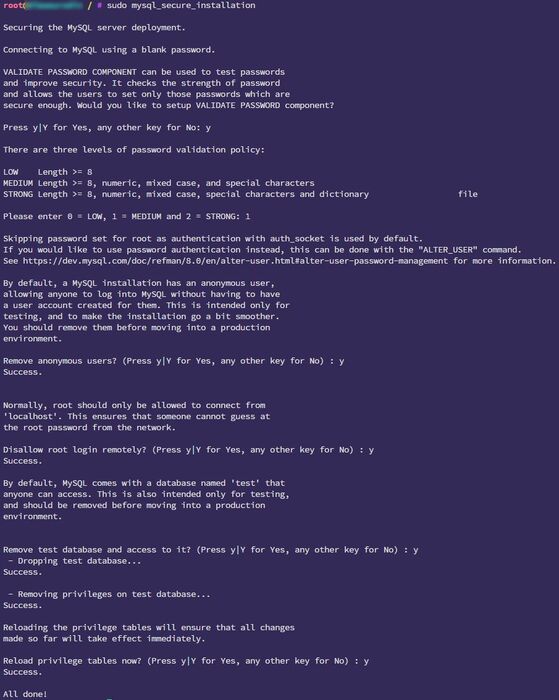
Information: Follow the on-screen instructions to set up the root password and other security parameters.
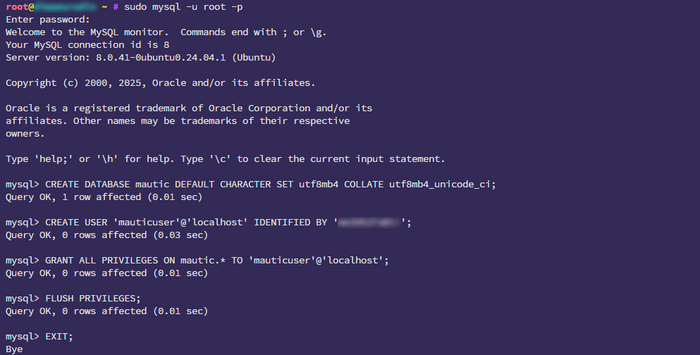
- Log in to MySQL:
sudo mysql -u root -p
- Create a database and user:
CREATE DATABASE mautic DEFAULT CHARACTER SET utf8mb4 COLLATE utf8mb4_unicode_ci;
CREATE USER 'mauticuser'@'localhost' IDENTIFIED BY 'your_secure_password';
GRANT ALL PRIVILEGES ON mautic.* TO 'mauticuser'@'localhost';
FLUSH PRIVILEGES;
EXIT;
Warning: Replace your_secure_password with a truly secure password for the database. Store it in a safe place!
Installing Mautic
- Navigate to the web directory and download Mautic:
mkdir /var/www/html/mautic && cd /var/www/html/mautic
sudo wget https://github.com/mautic/mautic/releases/download/6.0.0/6.0.0.zip
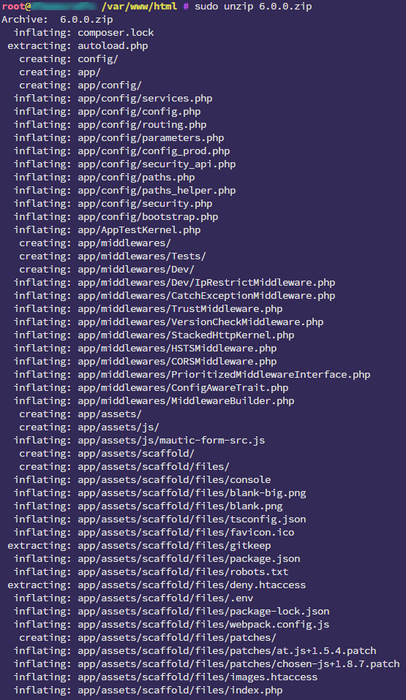
 2. Unpack the archive and remove it:
sudo unzip 6.0.0.zip
sudo rm 6.0.0.zip
 3. Set up access permissions:
sudo chown -R www-data:www-data /var/www/html/mautic
sudo chmod -R 755 /var/www/html/mautic
Configuring Apache Virtual Host
- Create a configuration file:
sudo nano /etc/apache2/sites-available/mautic.conf
- Add the following configuration:
<VirtualHost *:80>
    ServerAdmin webmaster@localhost
    DocumentRoot /var/www/html/mautic
    ServerName your-domain.com
    ServerAlias www.your-domain.com
    <Directory /var/www/html/mautic>
        Options FollowSymlinks
        AllowOverride All
        Require all granted
    </Directory>
    ErrorLog ${APACHE_LOG_DIR}/mautic_error.log
    CustomLog ${APACHE_LOG_DIR}/mautic_access.log combined
</VirtualHost>
Warning: Replace your-domain.com with your actual domain name.
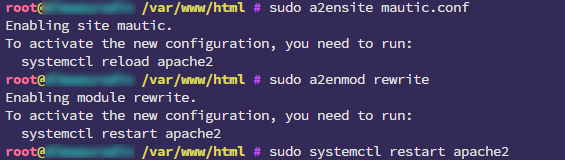
- Activate the site and restart Apache:
sudo a2ensite mautic.conf
sudo a2enmod rewrite
sudo systemctl restart apache2
Configuring Mautic via Web Interface
-
Open a web browser and go to your domain name address
http://your-domain.com
-
Configure the database connection:
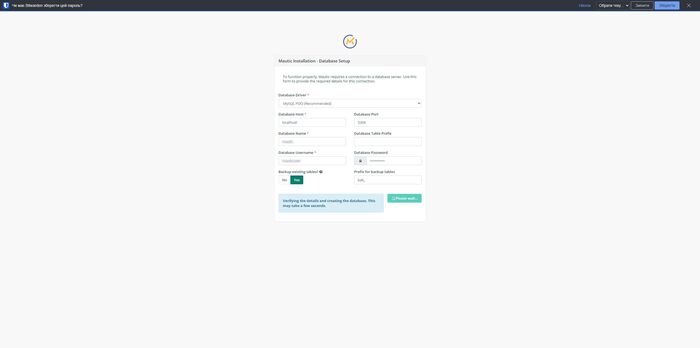
- Host:
localhost - Database name:
mautic - User:
mauticuser - Password:
your_secure_password
- Host:
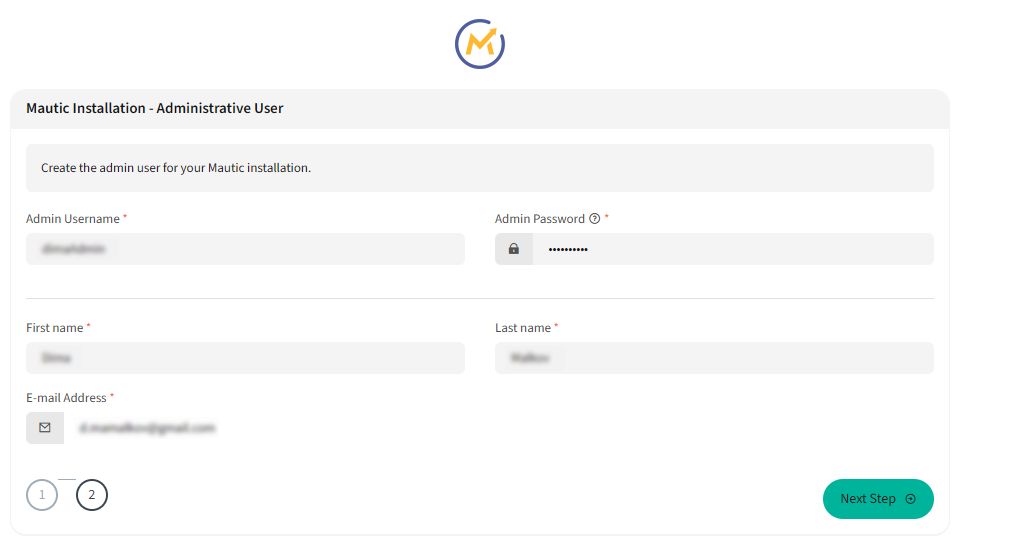
-
Create an administrator account and configure email for sending messages
Setting Up Email Marketing Automation
After installation and basic configuration of Mautic, it’s recommended to immediately set up the system for effective email marketing automation:
-
Setting up email protocols:
sudo apt install -y postfix
sudo systemctl enable postfix
sudo systemctl start postfix
Tip: For production environments, it’s recommended to use external SMTP services (SendGrid, Amazon SES, Mailgun, Gmail) instead of local Postfix to improve email deliverability.
-
Checking SPF and DKIM records — make sure your domain has correct SPF and DKIM records to improve email deliverability.
You can learn more about this in our guide
-
Setting up automatic bounce handling:
- Configure a dedicated email address for receiving bounces
- In the Mautic interface: Settings → System Configuration → Email → Bounce Management
-
Creating email templates:
- Use the built-in Mautic editor to create responsive templates
- Upload ready-made HTML templates compatible with Mautic
-
Setting up segments:
- Create basic segments for audience segmentation
- Configure dynamic filters for automatic segment updates
-
Creating your first automated campaign:
- In the Mautic interface: Campaigns → New Campaign
- Add the “Contact added to segment” trigger and configure an email sequence
Warning: Before sending mass mailings, always conduct testing on a small group of recipients to verify correct delivery and display of emails.
Setting Up Task Scheduler (Cron)
For proper Mautic operation, you need to set up a task scheduler:
sudo crontab -u www-data -e
Add the following lines:
# Run Mautic tasks every 5 minutes
*/5 * * * * php /var/www/html/mautic/bin/console mautic:segments:update
*/5 * * * * php /var/www/html/mautic/bin/console mautic:campaigns:rebuild
*/5 * * * * php /var/www/html/mautic/bin/console mautic:campaigns:trigger
# Send emails every minute
* * * * * php /var/www/html/mautic/bin/console mautic:emails:send
# Run other Mautic tasks hourly
0 * * * * php /var/www/html/mautic/bin/console mautic:import
0 * * * * php /var/www/html/mautic/bin/console mautic:webhooks:process
0 * * * * php /var/www/html/mautic/bin/console mautic:broadcasts:send
0 * * * * php /var/www/html/mautic/bin/console mautic:maintenance:cleanup --days-old=365
Performance Optimization
Configure PHP:
sudo nano /etc/php/8.2/apache2/php.ini
Make the following changes to the PHP configuration:
memory_limit = 512M
upload_max_filesize = 100M
post_max_size = 100M
max_execution_time = 300
max_input_time = 300
Information: Description of PHP directives and their impact on Mautic operation:
- memory_limit — defines the maximum amount of memory a PHP script can use. Increasing to 512M is necessary for processing large numbers of contacts and complex marketing campaigns.
- upload_max_filesize — maximum size of an uploaded file. The value of 100M allows uploading large media files, CSV contact lists, and other resources.
- post_max_size — maximum size of POST request data. It should be no less than upload_max_filesize to ensure successful file uploads.
- max_execution_time — maximum execution time of a PHP script in seconds. Increasing to 300 seconds (5 minutes) is necessary for resource-intensive operations such as contact imports or email campaign sending.
- max_input_time — maximum time PHP can spend processing input data (including file uploads). A value of 300 seconds ensures correct upload of large files.
Restart Apache:
sudo systemctl restart apache2
Verifying the Installation
- In your browser, go to your server address (
https://your-domain.com) - Log in to the administrative panel using the credentials specified during installation
- Check system functionality in the “Settings” → “System Information” section
Troubleshooting Potential Issues
Tip: Most installation problems are related to access permissions, database settings, or PHP configuration.
Permission Problems
If file access errors occur:
sudo chmod -R 755 /var/www/html/mautic
sudo chown -R www-data:www-data /var/www/html/mautic
Database Problems
If database connection errors occur, check the correctness of settings in the file /var/www/html/mautic/app/config/local.php.
Email Sending Problems
If emails are not being sent, check the SMTP settings in the Mautic administrative panel (Settings → System Configuration → Email).
For more detailed information, you can refer to the official documentation:

